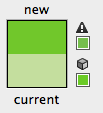
| RGB: 0% Red, 100% Green, 0% Blue. |
| The colour of the green when the colour mode is converted to CMYK. |
Photoshop is default to RGB, not all filter options are available in CMYK. RGB files are smaller, photoshop calculations are in RGB so in some instances if you're wanting to apply an effect in CMYK you're gonna have to switch to RGB then back to CMYK, but that comes with some problems, because obviously some RGB colours can't be reproduced in CMYK.
One of the main reasons that colours are sometimes out of gamut is because they're over-saturated, this is easily discovered by turning on the Gamut warning in the View tab.
The silver shows where the colours that are outlying the gamut of CMYK, you can bring it back to colour through methods of desaturating the image, you can then apply a mask to the unaffected areas to attempt to pull more colour back into them to stop them be unsaturated too. It's not much but it does improve the image subtly.
The way we got shown to empty a palette was to hold down alt and then click on all colours quickly to get rid of them and then to save the palette as a template to use for later use, although i'm sure there is other ways to create blank palettes then this, it seemed a bit too much of a faff clicking every colour to get rid of it to just create a blank template. Photoshop seems to advanced just for a method like that.
In the colour picker, if you pick a new colour, either one or both symbols will appear on the right hand side, the upper warning means it's not a colour produceable in CMYK, while the bottom gives you the nearest web-safe colour.

The 'Save swatches for exchange' is for moving between different softwares, Adobe Illustrator or indesign for example.
When saving the swatch normally, it will be placed into the photoshop folder for future reference.
Clicking Reset swatch brings you back to the preset swatch you have as you open photoshop. So if i then wanted to start with a empty swatch, using the one i created with none in it. I can load it up really easily because of it been saved in the Photoshop presets folder.
It would appear like this, which you copyable and you can transfer it to memory sticks to always have your swatches with you.
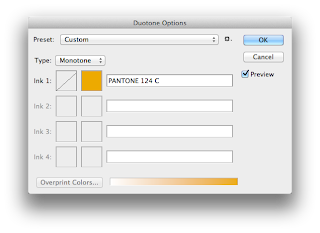
If we wanted to apply a spot colour in photoshop, it would be called a duo-tone.
This enables you to apply spot colours (monotone) that can be sent off to be printed instead of having to have to use CMYK which would up the cost of the print.

To make sure it's a spot colour it has to read it's pantone label in the bar next to the colour. You can use the curve to edit the percentage of ink used.
You can then have two colours which is then officially called Duotone, the use of two inks. It's a good way to print a greyscale image using an additional colour.
Outcome from the preset above.
There is however presets which are really good starting points.
In a CMYK image, you can look in the channels pallet, you can see the colour specification that a printer would use.

This can be then used to create a spot colours useable on photographs by turning them to Grayscale, and then applying a spot colour channel.
So for example you can have a spot colour of yellow over the top of a gray photograph. Turning down the solidity to 0% creates a transluscent effect like below.
Changing the solidity value changes the opacity of the ink as a simulation as to what it'd be like if the ink used it opaque. (At 100%)
System 3 inks are transparent. - You can apply another grayscale photograph into the spot colour to create overlays which is really effective as David Bowie shows us below.
This can also be useful if you're wanting to create such an effect using text.


No comments:
Post a Comment